Sale!
Brother ScanNCut SDX1200
Original price was: £499.00.£449.00Current price is: £449.00.
PLEASE NOTE THAT THE OFFICE WILL BE CLOSED FROM 12PM FRIDAY 20TH DECEMBER 2024 AND WILL RE-OPEN ON THURSDAY 2ND JANUARY 2025
ORDERS FOR DELIVERY PRIOR TO CHRISTMAS WILL NEED TO BE SUBMITTED BY 2.30PM ON THURSDAY 19THDECEMBER 2024.
ORDERS RECEIVED AFTER THIS TIME AND DATE WILL BE DESPATCHED ON THURSDAY 2ND JANUARY 2025.
Merry Christmas & A Happy New Year to all our customers. Thank you for your continued support.
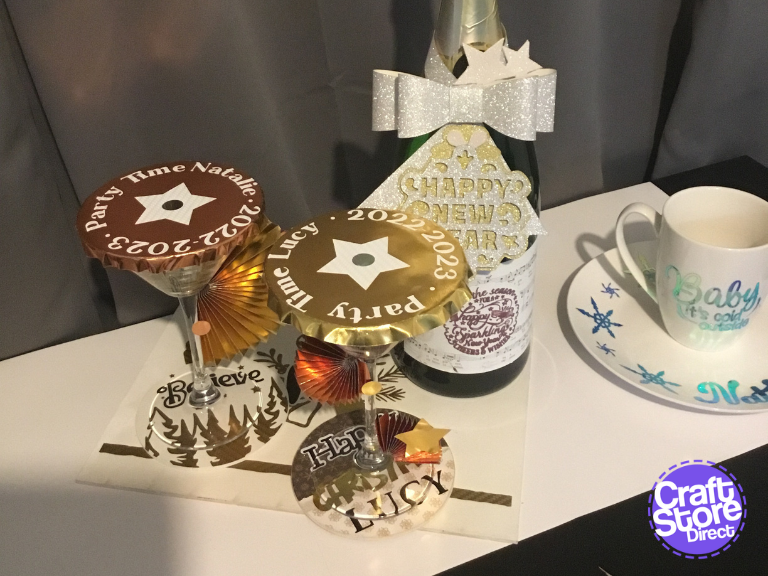
Now, you don’t have to become a Master Mixologist to have fabulous sparkles this party season. Add glitter and shine to your New Year celebrations with these cocktail decorations.
Craft Materials We Used:
• Brother ScanNCut SDX1200
• SDX Vinyl Auto Blade
• Standard Tack SDX Cutting Mat
• Silhouette Carbon Fibre
• Colour + Shape Snitty Cutter


Who said safety had to be boring? Start by measuring your cocktail glass – a typical champagne glass has a diameter of 50mm, a martini glass is 105mm, a margarita glass is 108mm and a tumbler is 80mm. Now, as its not advisable to mix drinks, pick the size for your chosen tipple; alternatively, go for the largest likely size.
Using foiled paper, cut a circle 20mm larger in diameter than your chosen cocktail. We use foiled paper so it keeps it’s form when crimped over the edge of the glass. Into the centre of this circle cut a 5-10mm circle depending on your straw.
You can choose to add additional vinyl decorations using text on a path. Choose a nice bold font, or a script font that you can easily weld.


This decoration will work on most stemmed glasses. Using the remaining sheet of foiled paper, we are going to cut a long strip along the longest edge of the foiled paper. Now, we could use a trimmer, to keep our folding regular, let’s make our cutter do the heavy lifting.
In your design software, draw a rectangle 1½”/38.1mm wide and just slightly shorter than the length of your paper.
Draw a scoreline (either a dashed line, draw line or half cut line) that goes across the strip in the shortest direction.
Multiply this scoreline 10 times. Select all the scorelines, align them to the left hand edge. Use Distribute Space to set the space between them to 7mm. The bigger the space between the scorelines, the fewer folds you will need. Fill the rest of the strip with duplicates of this group. Delete any surplus scorelines and adjust spacing again if required.
Fold in a zig zag accordion motion. Attach one end of the strip to the stem of your glass and the other to the bowl.
Decorate as you wish.

The straw decoration is where you can really have some fun. You want to be able to see this drink is obviously yours. So, crack out the phone and take the silliest selfie you can. You can even play with some phone apps and filters to go crazy.
Print it at 2”/50mm diameter (or slightly smaller if you are decorating a champagne flute) onto an image transfer sheet using a laser printer. For inkjet users, swap to sticker paper instead and seal with clear vinyl. Transfer as normal for your chosen medium to acetate and cut out a slightly smaller circle so you get a nice clean edge.
Use a small piece of decorative card to form a loop to fit your straw and attach to your image.
You can then add additional decorations as you wish.


You can use the same technique from Step 2 decoration onto the stem of a glass. Just add a vertical cut line to halve the folding strip. This will give you two smaller decorations that you can put at the top and bottom of the stem.
You can use temporary repositionable adhesive or velcro dots to seal the loop to hold it onto your glass. Just remember when decorating your stem, you also need to be able to hold your glass comfortably.
If you are creating these glasses for a party at home, you might add more fun decoration.


Finally, get some absorbent coasters: materials can vary. Depending on material, you can apply your name in HTV or adhesive vinyl. For disposable coasters, we’d recommend adhesive vinyl while fabric based coasters have a longer shelf life.
Draw a circle matching the dimensions of your coaster.
Use offset to create a path inside the circle, onto which apply your name text. Bold simple fonts will work better and size to fit your coaster. You can use the baseline setting to adjust the type as needed.
You can also use symbol fonts to add additional decorative touches.

So, have fun this party season and make it one to remember, but please drink responsibly. Join us next time for a project to help you stay organised in 2023.
– Natalie x

Original price was: £499.00.£449.00Current price is: £449.00.
Original price was: £16.49.£14.84Current price is: £14.84.
Original price was: £10.00.£7.50Current price is: £7.50.


