3D Firecracker | Denise Clark | Silhouette UK Blog
3D Firecracker | Denise Clark | Silhouette UK BlogHalloween Tissue Box Hi It’s Denise here. My blog today is about making a 3D Firecracker. This the best time of the…
PLEASE NOTE THAT THE OFFICE WILL BE CLOSED FROM 12PM FRIDAY 20TH DECEMBER 2024 AND WILL RE-OPEN ON THURSDAY 2ND JANUARY 2025
ORDERS FOR DELIVERY PRIOR TO CHRISTMAS WILL NEED TO BE SUBMITTED BY 2.30PM ON THURSDAY 19THDECEMBER 2024.
ORDERS RECEIVED AFTER THIS TIME AND DATE WILL BE DESPATCHED ON THURSDAY 2ND JANUARY 2025.
Merry Christmas & A Happy New Year to all our customers. Thank you for your continued support.

So for this blog, I am going to go a little bit outside the box.
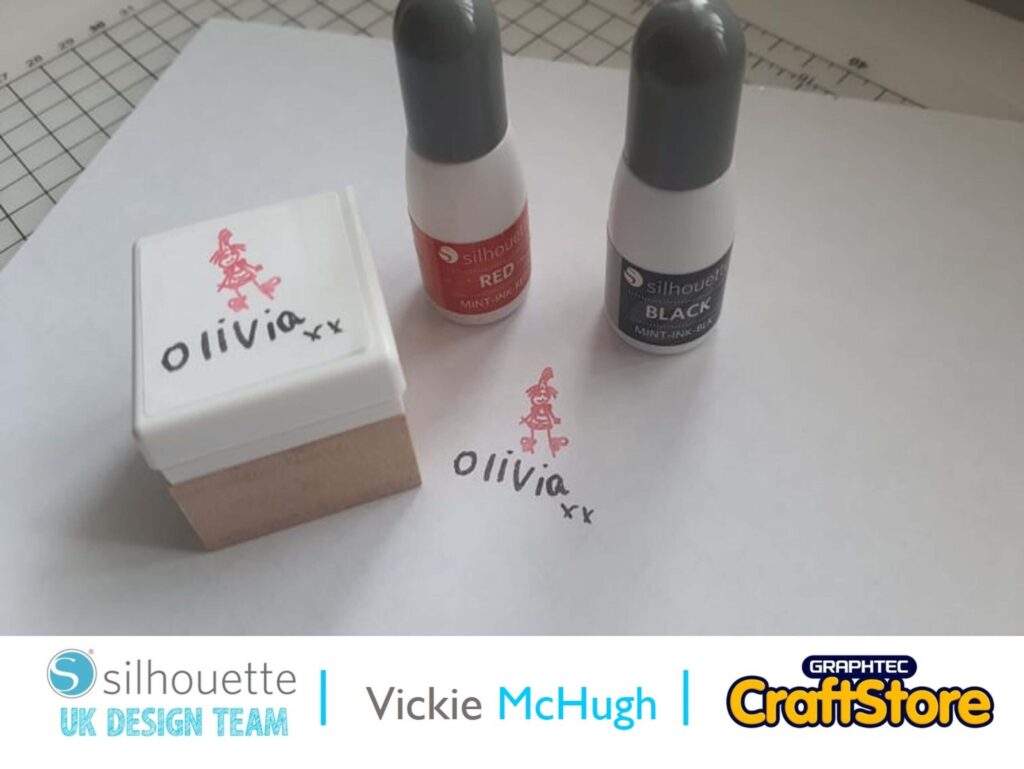
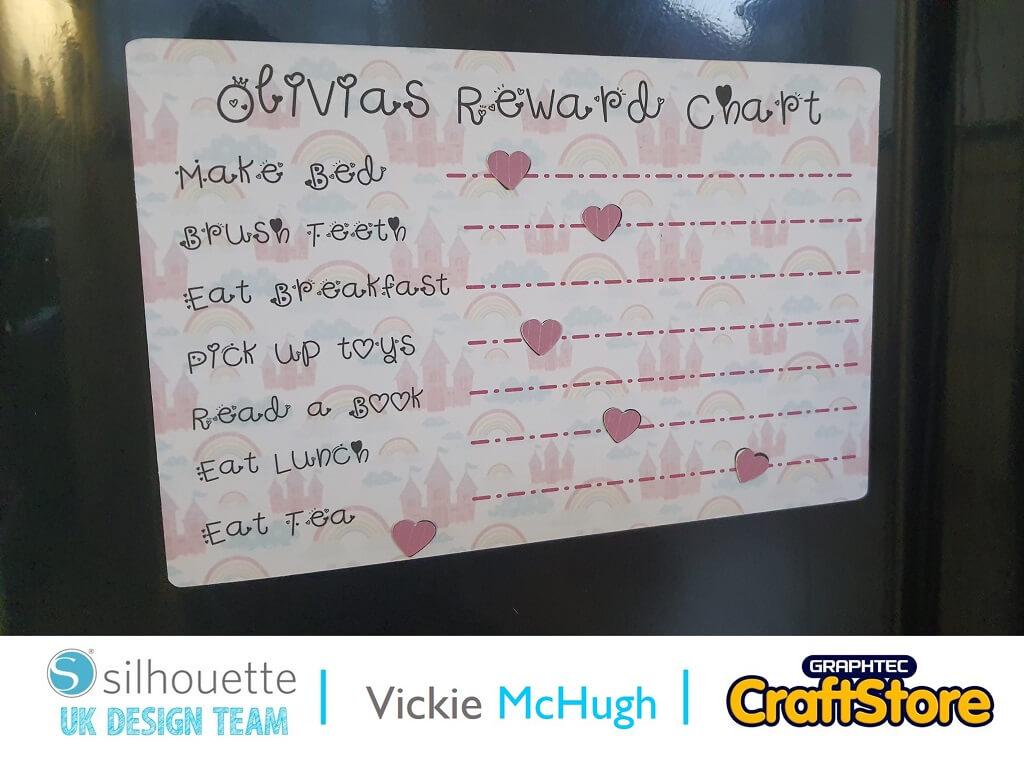
I am going to make a personalized reward chart using Silhouette Magnetic sheets.
Items I Used
• Silhouette Curio Machine
• Silhouette Standard Ratchet Blade
• Silhouette Cutting Matt
• Silhouette Magnetic Sheets
• Card Stock

Making sure that you have the registration marks on in page set up, create a large rectangle. This will be the foundation of the reward chart.
I am going to add a background to the reward chart, make sure your rectangle is highlighted.
Go to Library and double click on the background. It will then automatically fill in your shape. I am using Princess Castle for mine.
If you want to make the background transparent, go to fill and move Transparency up.
I am setting my transparency to 70%.
I am using Unicorn Princess font for this, so I have written my daughter’s name and “chores” using this font.
I am also going to use the line tool to separate the different “chores” and have (of course) coloured them in pink!
Click on File and Print


To make the tokens, I am using a cute little heart shape.
I have lined it up on top of my reward chart to make sure they are the correct size. I have then copied it a number of times on a different page.
Click on File and Print
Once the reward chart and hearts have printed, place it onto the 8 x 12” mat.
Click SEND in design studio
Cut setting: Cardstock – Heavy
Blade: 3
Force: 30
Speed:4
Passes: 1


Once the paper has been cut, place the magnet paper on the mat.
Turn registration marks off in Page Set up and click Send
Change settings:
Cut setting: Cardstock – Magnet paper, Adhesive back
Blade: 6
Force: 33
Speed:1
Passes: 2
Click SEND
Once you have all the pieces.
Remove the back of the magnet paper and stick on the printed reward chart and hearts.

I have really enjoyed putting this together for my little princess.
The magnet paper is so versatile, the possibilities are endless!!
I look forward to seeing what you make.
Please don’t forget to tag me on Instagram so that I can see your masterpieces @crafty_vickie
– Vickie McHugh –

• Designs Used:
• ‘Unicorn Princess’ Font
Design Store Artist: Vividdiy8
Design Store ID: 316103 > Download
• Princess Castle Paper
Design Store Artist: Miss Kate Cuttables
Design Store ID: 203233 > Download