Christmas Baubles | Karen Moss | Silhouette UK Blog
Christmas Baubles | Karen Moss | Silhouette UK BlogChristmas Baubles | Silhouette Glitter Vinyl For this week’s projects we are all using Silhouette Glitter Vinyl for Christmas decorations. I had…
PLEASE NOTE THAT THE OFFICE WILL BE CLOSED FROM 12PM FRIDAY 20TH DECEMBER 2024 AND WILL RE-OPEN ON THURSDAY 2ND JANUARY 2025
ORDERS FOR DELIVERY PRIOR TO CHRISTMAS WILL NEED TO BE SUBMITTED BY 2.30PM ON THURSDAY 19THDECEMBER 2024.
ORDERS RECEIVED AFTER THIS TIME AND DATE WILL BE DESPATCHED ON THURSDAY 2ND JANUARY 2025.
Merry Christmas & A Happy New Year to all our customers. Thank you for your continued support.
Hi Cheryl here again.
The nights are getting lighter and the days longer.
You will now see in the supermarkets (yes believe it), the Easter products are here.
I felt this project is perfect and it’s great fun to make and I know you will love this one as you can make it with younger members of the family.
• Silhouette Cork Sheets
• Cardstock
• Paints
• Glue or DS
In your software open your files in the design space and on the page setup panel on the right hand side, you should leave your mat size set at 12×12 and change your media size to A4, you will then see the white space change to fit accordingly.
You want to make the box shape fit as much of the A4 mat as possible but also include the bow shape and handle.
Once you are happy, remove the light pink shapes that are on the box.
To do this you will need to right click and pick un-group, hit enter and you should now be able to remove only the lighter pink pieces.
Put your card onto your mat and load into your machine. Make sure that your material selected is plain cardstock and if you are happy with the other settings hit send to cut.
Once cut, remove the card and put to one side, repeat the same for the bows and the handle.
Now you want to remove those pieces from your mat and replace with the lighter shaded shapes.
The media size should now be changed to 5×7 and you will see your mat shrink to fit the 2 long pieces on one sheet and leave the smaller ones to repeat.
Now, change your material to Cork Sheets and you will see your settings change which you can amend if you need to and then hit send.
Repeat the same step here for the smaller shaped pieces .
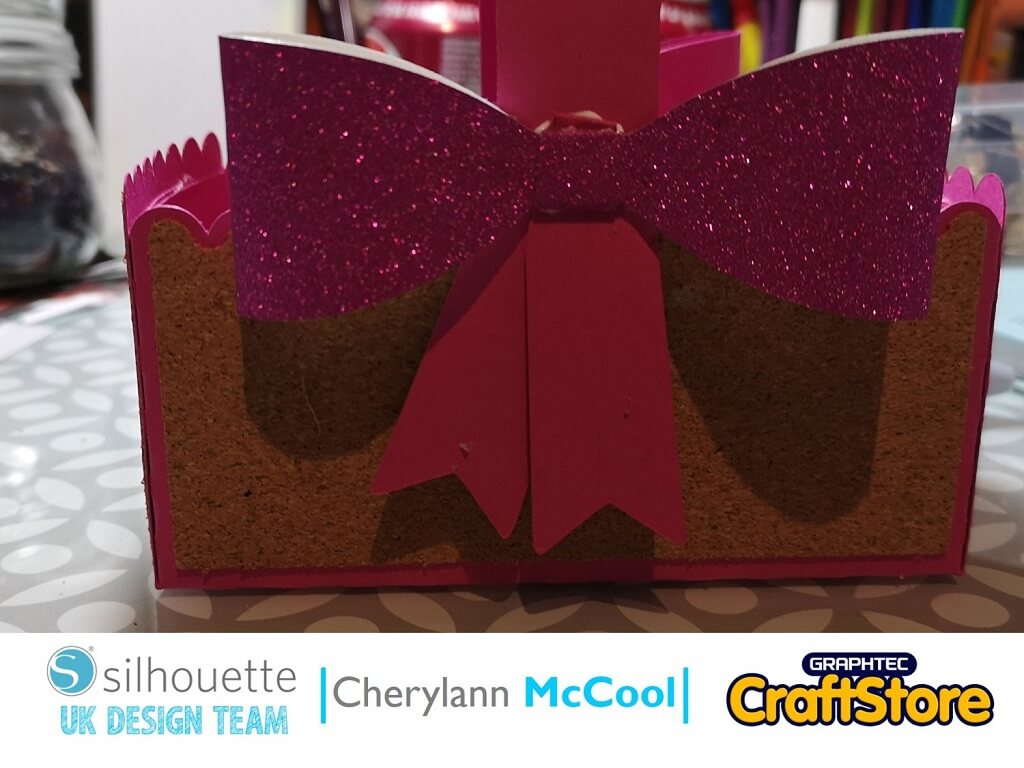
Now it’s time to build your basket up!
Start by building the long sides up and glue the tab to the inside of the short side and do this for other side too.
Once your box is made put your cork sheet pieces around the box.
Fold the tabs on the long strip and glue them to the underneath of the box and shape it to the shape of handle.
For your bow pieces (I made bows for each side), fold the curved edge into the middle and glue the tabs in the centre of each other.
Wrap the remaining long piece around the middle and with the smaller pieces fold over to an angle and attach underneath the bow then attach at each side.
Now, if you want to personalise further you can add text to the top short sides of the box then repeat steps 1-3 and once cut attach to ends.
You now have an easter basket for pancakes or eggs.
I have had great fun making this basket!
Coming into this time of year it can be adapted for any occasion, it’s a great all-rounder.
I loved using the cork sheets and I think they are fantastic! I liked using it here because it helped make the box stronger and you wouldn’t need to leave it full and you could put a pattern into the cork.
Bye for now!
– Cherylann McCool xx –
• Design Used: Easter Basket
Design Store Artist: Lori Whitlock
Design ID: 252100 > Download
• Design Used: Did Some Bunny Say Easter
Design Store Artist: Megan Hardy Designs
Design ID: 182092 > Download