3D Cardstock Firecracker
Hey everyone!
Vicky here from Cut That Design!
In this blog post I bring you this fun 3D firework, which is great for crafting with the kids over the school holidays!
For this creation I used both Printable and Regular Cardstock, the great thing about using the adhesive cardstock is no glue is required!!
Items you will need:
Silhouette Adhesive Backed Cardstock
Silhouette Printable Adhesive Backed Cardstock
Firstly, I went in search of a firework design in the Silhouette Store and came across the 3D Tall Stick Firecracker Box.
I then purchased, downloaded, and opened it in Silhouette Studio.
I always like to ‘colour in’ the sections with the colour cardstock I’ll be using.
For the individual rectangular accents, I again went searching in the Silhouette Design Store, this time for a pattern. I chose the Halloween stars pattern, although it says Halloween, it’s a pretty versatile pattern and I’d say can be used on a number of other projects.
Once I downloaded the pattern, I added it to the Silhouette Library under Patterns.
I then grouped the four rectangular accent shapes together.
I then went to the ‘Fill Panel’ on the left-hand side of the Silhouette Studio screen, I clicked on the tab with polka dots, the pattern I downloaded was under the header ‘patterns’. I clicked on my pattern and the rectangles were now filled in as shown.
Next up, I adjusted the page settings to A4 as I am using A4 Printable card for this part, and I turned the ‘Registration Marks’ on.
I then sent the document to my printer (adjusting my print settings accordingly).
Once the document had printed, I loaded my silhouette with the print.
I used the Material setting of Cardstock, Printable Adhesive-Backed and I left the default cut settings as is. I then sent my file to cut.
Once cutting had been completed, I removed it from the cutting mat and left it to one side.
Next up, I changed the cut settings in the ‘Design Area’, to 12×12 cardstock and removed the registration marks.
I grouped the design by colour, as it’ll be easier for me to move them around on the cutting mat.
I loaded my cutting mat with the first colour of cardstock, set my material as; Cardstock Adhesive Backed, and kept the default cut settings.
I pressed send to cut. I then removed the material from the cutting mat.
I repeated these steps for each colour of cardstock.
After I removed the excess card, I started to assemble the firework (pic 1).
I folded the top half like steps (pic 2), and stuck one of the hexagonal shapes with a hole in the middle on top of the lower part of the steps (pic 3), I then folded the ‘fuse’ around (pic 5) and put it through the small hole in the hexagonal shape (pic 6).
Picture 7 shows what it looks once I completed all the above steps.
The bottom is the hexagon with the hole in and rectangles coming from the sides.
I stuck all the sides together as shown in Pic 1. Once they were all stuck down, I gently pushed it into the bottom of the main firework shape. (Pic 2)
Picture 3 is an example of what it looks like once fully pushed in.
Next up I attached the printed accents to the side walls of the firework.
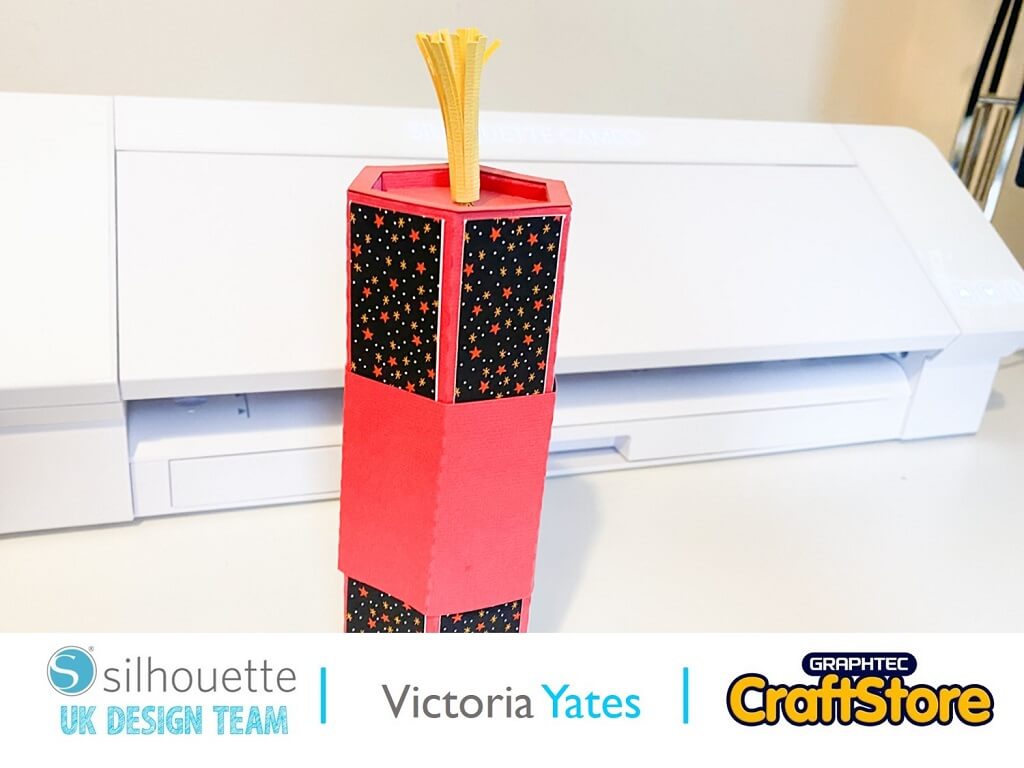
I then added the wrap around the middle of the firework, as shown in the image below!
Here we have the completed firework!
I think these would make a lovely centerpiece for a Bonfire Night themed picnic, you could even make a few more in different colours and patterns.
Although, my son liked the look of this one and is using it to play with! I’m not complaining it will keep in quiet for a bit!
Thank you for reading my blog post, I hope it’s given you lots of inspiration for creating your own Bonfire night crafts.
Happy Crafting!
– Victoria Yates xx –


