Wedding Invitation | Vickie McHugh | Silhouette UK Blog
Wedding Invitation | Vickie McHugh | Silhouette UK Blog Creating A Beautiful Wedding Invitation With wedding season around the corner, why not tap into your creative side and make your own…
PLEASE NOTE THAT THE OFFICE WILL BE CLOSED FROM 12PM FRIDAY 20TH DECEMBER 2024 AND WILL RE-OPEN ON THURSDAY 2ND JANUARY 2025
ORDERS FOR DELIVERY PRIOR TO CHRISTMAS WILL NEED TO BE SUBMITTED BY 2.30PM ON THURSDAY 19THDECEMBER 2024.
ORDERS RECEIVED AFTER THIS TIME AND DATE WILL BE DESPATCHED ON THURSDAY 2ND JANUARY 2025.
Merry Christmas & A Happy New Year to all our customers. Thank you for your continued support.

This was the first time I have used shrink plastic and after a bit of trial and error, I was able to create a beautiful Easter bracelet ready to create this blog.
The jewellery making kit comes with everything you need so it’s a great starter set if you want to try it.
I will defiantly be purchasing some more shrink plastic sheets in the future as the possibilities are endless.
Items I Used
• Silhouette Curio
• Silhouette Standard Ratchet Blade
• Silhouette Curio Cutting Mat
• Silhouette Jewellery Making Starter Kit
• Printer

Using the Silhouette Store, I used the search engine and typed “Easter” and there were a large number of designs to choose from, I firstly chose an Easter based font and then chose images in the 4 Easter set.
With this set, I have made them into a charms myself, but if you would like an easier option, there is a Easter charm set – Design store ID – 17478
To import my purchased file into the silhouette software, click on the “Library” tab find the image you want to import and double click.
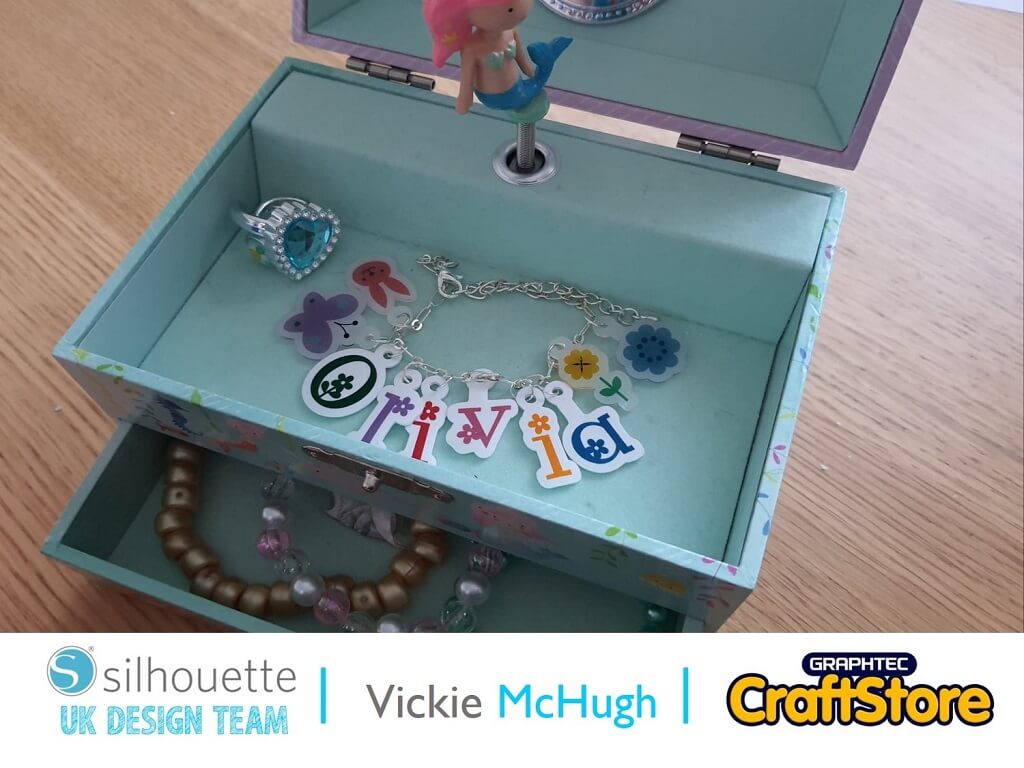
Use the text function to write the word for your bracelet. I have written Olivia as I am making the bracelet for her.


Under the Page setup make sure that the registration marks are turned on. This way, the Curio knows where to cut.
Ungroup the wording and images by right clicking and selecting ungroup. Starting off with the name, move the first letter over. Create a small circle using the drawing tool, which will become the charm hole. Place it over the first letter, mine is the O. group the letter and the circle, by making a compound path.
To create the outline to cut, highlight the “O” and click on the Off Set tab. I have off set my shape to 0.085.
I have then coloured in my letter by using the Fill tab, I have chosen a green.
Follow this process for all of the letters and images.
Please note that if you have purchased the Charm file, you will not need to follow this process.
The charms will now need to be resized.
Due to trial and error I have found that the perfect size for a charm is 2.5”.
You may need to use 2 pages depending on how many charms you have.
Don’t forget, they will shrink!


Place the shrink paper in the printer and print the pages by going to file print, again make sure that you have the registration marks and your design is with the marks.
**If you are using the clear shrink wrap remove the backing**
Place the printed shrink paper on your mat (I have had to cut mine down as I am using the smaller mat)
Click on the Send tab. Change the material to show Shrink Plastic.
Check that the areas you want to cut are highlighted in red. If they aren’t click on them and under the Tool 1, select CUT.
If the lettering is highlighted in red, this will need to be deselected by clicking and changing the Tool 1 option to NO CUT.
Once you are happy, click on SEND. The machine will then read the registration marks and with cut out the shapes.


Preheat the oven to 160c.
Arrange the cut out pieces, printed side up onto baking paper making sure there is adequate space between them.
Put them in the oven and watch for the pieces to curl, shrink an then flatten. Then bake them for an additional 30 seconds.
Remove from the oven and take the baking sheet off. Use a flat implement to gently press on the charms to make them flat until they are cool.
**Image shows how much they actually shrink**
Using the pliers and jump rings provided in your pack to attach the charms to the bracelet.
I have placed mine using 2 images then the name then the other 2 images.
You then have your completed charm bracelet.


I have absolutely loved putting this charm bracelet together and learning to use a different type of media.
With the jewelry starter kit, you can make a wide range of jewelry such as bracelets and necklaces. You could even us my mother’s day blog and make a personalized keyring using the shrink paper.
I will defiantly be crafting again using this media.
– Vickie McHugh –

• Design Used: 4 Easter Set
Design Store Artist: Lori Whitlock
Design Store ID: 26531 > Download
• Design Used: LW Easter Font
Design Store Artist: Lori Whitlock
Design Store ID: 76572 > Download