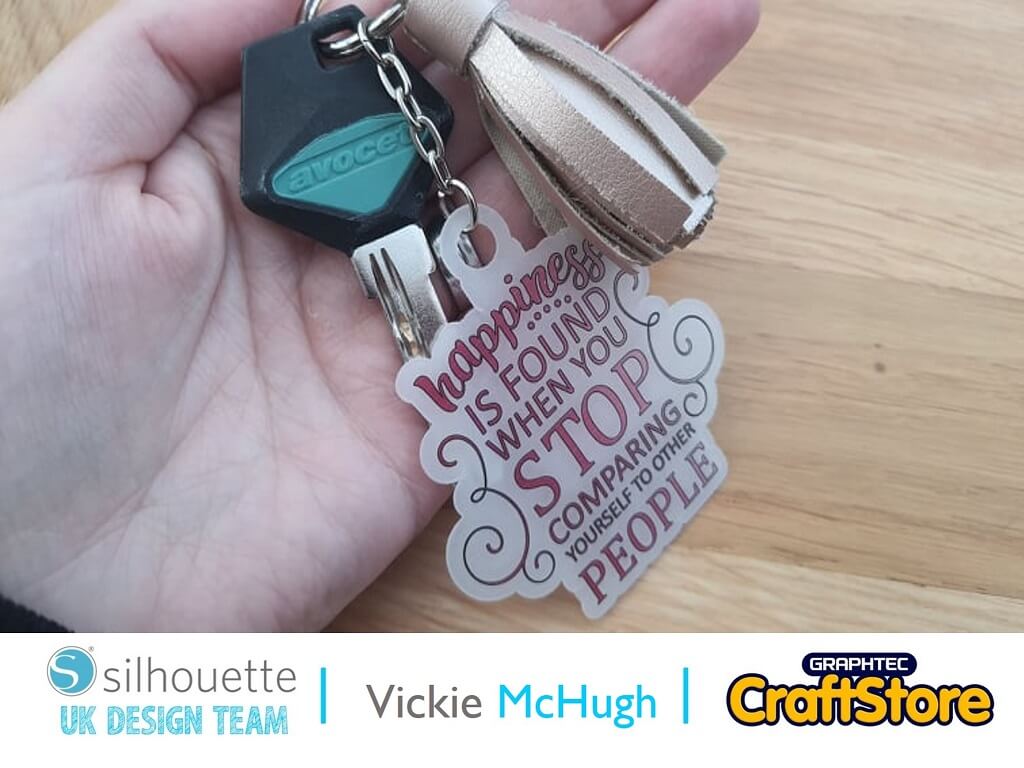
Inspirational Quote Keyring
Hello and welcome to this weeks Crafty Vic tutorial.
Like I said during my last blog, I love working with Shrink Plastic, so for this keyring I will be using the Silhouette Shrink plastic in the clear.
I will also be making a tassle to add to the keyring.
Items I Used
• Silhouette Portrait 3
• Shrink Plastic Sheets
• Leatherette Sheets
• Standard Ratchet Blade
• Glue Gun
Having looked in the Silhouette design store, there are some amazing inspirational quotes.
I have purchased a few but I have decided to go for “happiness is found quote” (design code below).
Once it is purchased it can be pulled into Silhouette studio from the library by double clicking on the file.
If you have never worked with shrink plastic before, it shrinks a considerable amount once it’s been baked, so I am going to make the image about half a size of A4.
Using the drawing tool, create a circle above the wording which will be used to attach the shrink plastic to the keyring.
Highlight the circle and the wording and create a compound path, either by right clicking or using the modify panel.
Then, use the offset panel to create an outer offset
Using the Fill tab, I have filled in the text using a gradient pink and black.
Place the shrink paper in the printer and print the pages by going to file print, again make sure that you have the registration marks and your design is with the marks.
Click file and print.
Check that the areas you want to cut are highlighted in red.
If they aren’t click on them and under the Tool 1, select CUT.
If the lettering is highlighted in red, this will need to be deselected by clicking and changing the Tool 1 option to NO CUT.
Preheat the oven to 160c.
Place the keyring, printed side up onto baking paper.
Put it in the oven and watch for the pieces to curl, shrink and then flatten.
Then bake them for an additional 30 seconds.
Remove from the oven and take the baking sheet off.
Use a flat implement to gently press on the charms to make them flat until they are cool.
I have purchased a tassle file from Etsy (see below).
Merge it into Silhouette Studio by going to File and Merge.
Arrange the tassle files onto silhouette studio.
Click on send.
Using your glue gun put the tassle together.
Now that you have all of your pieces, use some pliers to attach some jump rings to the tassle and the shrink keyring.
This can then be attached together to make the finished keyring.
I hope you have enjoyed this keyring tutorial.
Shrink plastic is one of my favorite types of media and can be used to create lots of things as you can see from my last 2 tutorials.
I look forward to seeing what you make. P
lease don’t forget to tag me on Instagram so I can see your masterpieces @crafty_vickie……my next tutorial is something for the home
– Vickie McHugh –
• Design Used: “Happiness Is Found” Quote
Design Store Artist: Carina Gardner
Design Store ID: 256153 > Download


