
Summer Sun Catcher | Karen Moss | Silhouette UK Blog
Summer Sun Catcher | Karen Moss | Silhouette UK BlogSummer Sun Catcher | Silhouette Shrink Plastic Sheets On a lovely sunny day what is nicer than to have a pretty…
PLEASE NOTE THAT THE OFFICE WILL BE CLOSED FROM 12PM FRIDAY 20TH DECEMBER 2024 AND WILL RE-OPEN ON THURSDAY 2ND JANUARY 2025
ORDERS FOR DELIVERY PRIOR TO CHRISTMAS WILL NEED TO BE SUBMITTED BY 2.30PM ON THURSDAY 19THDECEMBER 2024.
ORDERS RECEIVED AFTER THIS TIME AND DATE WILL BE DESPATCHED ON THURSDAY 2ND JANUARY 2025.
Merry Christmas & A Happy New Year to all our customers. Thank you for your continued support.
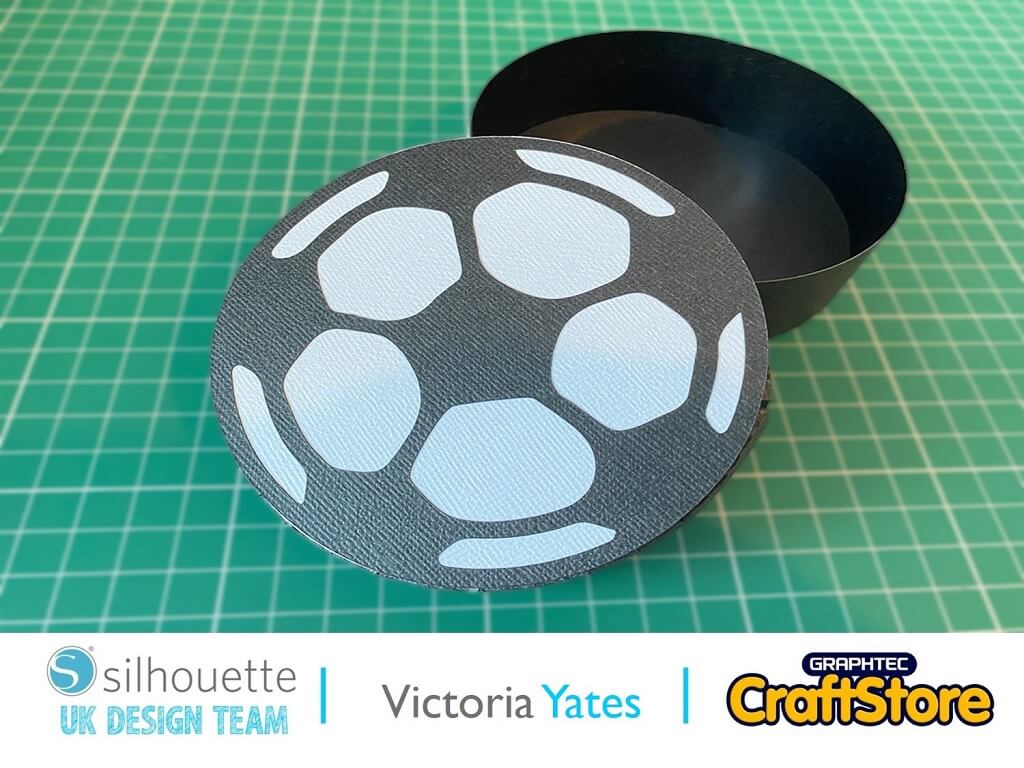

Hello again, Vicky here from Vee Creative.
Today’s post is Football (Soccer) themed ready for the start of the European Football Championships which start this month.
In this post I’ll be showing you how I put together this 3D football box together using Cardstock.
This design is perfect for Party Favour’s, or any football themed get together.

Firstly, as always I downloaded and opened the file I purchased from the Silhouette Design store.
What was really helpful with this design is the designer had put little notes to say which sections were for which parts of the box (e.g; Base and Lid)
I did delete the notes as I didn’t want them to be cut.
I coloured the sections that would be cut in black and white card, and separated them on the mat as shown, I then clicked send on the top right and adjusted my cut settings.
Material: Cardstock, Self-Adhesive
Blade Depth: 4
Force: 29
Speed: 3
My blade was picked up automatically, I was using the Premium Blade.
I Loaded my Silhouette Cameo with the Black cardstock, and then the white cardstock.


1: I gathered the sections for the base, and folded the bottom flaps of the 2 rectangle bases along the score marks – as shown.
2: Using the adhesive side of one of the base circles, I gently assembled the bottom flaps of one of the rectangles to the adhesive part of the circle.
3: I then attached the next rectangle section, folding the flap of the smaller edge of the rectangle inside the straight edge of the already attached rectangle. (as shown)
4&5 : Once all the rectangles were attached, I added the final base circle, with the Non-adhesive side facing up.
1: Next up I gathered all the parts together to assemble the lid.
Again I folded the flaps of the rectangles along the score line.
2/3&4: Following the same method as the base, I assembled the rectangles to the black part of the circle lid.
I them added the white circle to the top of the lid, again with the non-adhesive side facing up.
5: Lastly I added the black football cut out to the lid as shown.

Here’s the completed box.
I found it didn’t take that long to put the box together, I would suggest if you are using the Silhouette Adhesive card stock to assemble this, to cut more rectangle to place in the inner edges of the base and lid.
Alternatively you could add some tissue paper to stick around the inner edges.
Until next time, thanks for reading and Happy Crafting!
– Victoria Yates xx –
• Design Used: 3D Soccer Ball Box
Design Store Artist: Jamie Lane Designs
Design Store ID: 57680 > Download