Stars & Stripes | Helen Williams | Silhouette UK Blog
How To | Stars & Stripes Scrapbook Page
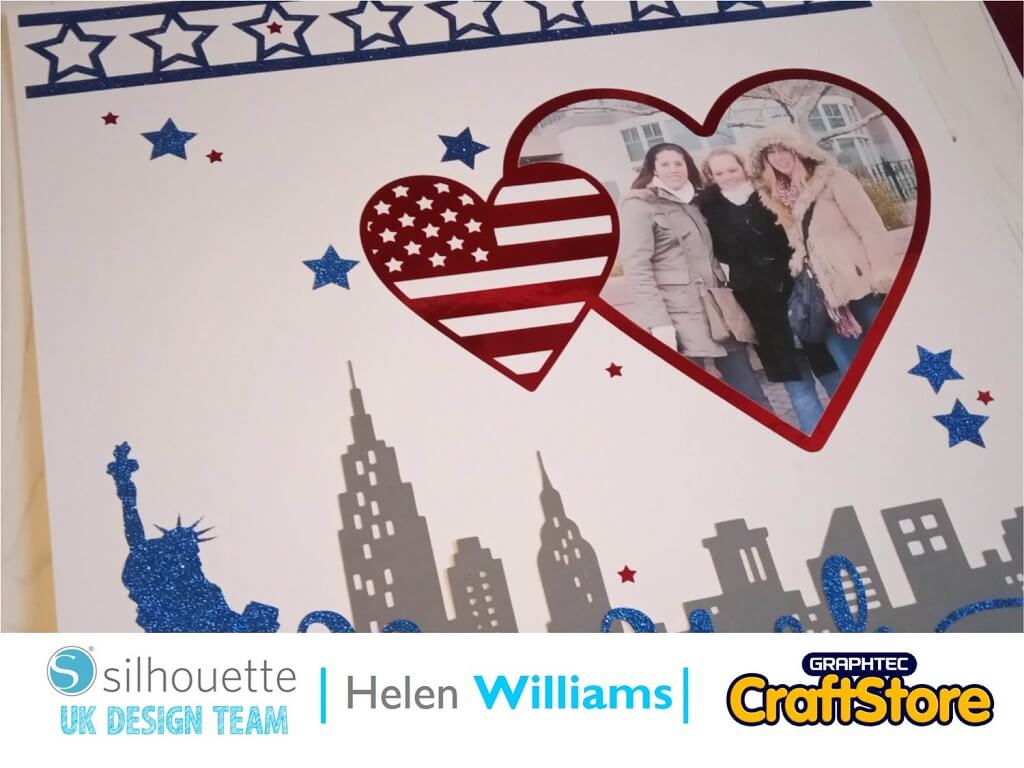
Today’s blog post in inspired by a trip to New York that I took when I was still at Uni with some friends.
I loved my time in the Big Apple so I’ve commemorated it in honor of Independence Day.
Here’s how I did it.
Arranging The Files
If you’ve read any of my other posts you will know that I like to create my scrapbook layouts in Silhouette Studio so that I can make sure that I’m happy with the design before I cut the pieces.
Firstly I changed the canvas size to 12 by 12 inches as this was the size of my scrapbook page. I did this using the page set up menu. I then ungrouped the separate files by selecting them and using the ‘ungroup’ button at the top of the screen. Once I had done this I then repositioned each file to where I wanted it on the page.
I loved the little red heart with the American flag in but I wanted a second heart to use as a frame for the picture. To do that I selected the heart shape. I then used the ‘offset’ tool to create an external offset but set the distance to ‘0’ so it effectively traced the shape. I then took the second shape that I had just made and used the select point tool (white arrow on left hand side of the screen) to delete the internal stars and stripes on the heart I had just created. This left me just a heart outline. I then made a copy of this to use later. I then did an external off set again on the heart outline to create a frame.
It is important to then select both the heart shapes that make up the frame and use the subtract tool in the modify window to make the two heart shapes into one shape. This will make the file into one shape that you can then uses to join to the flag heart shape. Make a copy of the flag heart shape and then position it over the heart frame to overlap. Then use the subtract tool again to make a gap in the heart frame. Then weld the two heart shapes together to create the finished frame.
(Make Sure You Scroll To The Right For Both Images)
Creating & Cutting Out The Photograph
I wanted the photograph element to be in the shape of a heart to fit within the frame that I had created. To do this I imported the photo into the silhouette studio software by going to file>open and then selecting my photograph. This will open it in the silhouette studio software. Once open resize it by clicking and dragging it until it fits nicely within your frame. Make sure that the frame is over the photograph, select the frame and the photograph and then using the crop tool in the modify window, crop the photograph in to the heart shape.
I decided that I wanted to cut the photograph out of silhouette sticker paper so that I could just stick it straight into the frame. Before printing the picture make sure that you add the registration marks onto the canvas. To do this in the page set up panel select the registration marks tap. On the style drop down menu select the type of machine you have and the size of paper you will be using. This will add registration marks to the file. You are now ready to print your photograph. I used the silhouette sticker paper to print on. Then I loaded the sticker sheet onto the mat and load it into the cutting machine. Go to the send tap in the silhouette software and select your material. As I was cutting out of the sticker paper I chose ‘sticker paper, white’ and cut using the default settings.
(Make Sure You Scroll To The Right For Both Images)
Cutting Out Each Element Of Your Scrapbook Page
I used three different materials in this scrapbook layout, grey cardstock, metallic vinyl and blue glitter vinyl. I grouped the elements that I wanted to cut out in each colour and cut them out using the default settings by material type.
Assembling The Scrapbook Page
Once I cut all of the elements out I then put them all on the scrapbook page starting with the grey skyline which I stuck down with normal glue. The glitter vinyl doesn’t always work well with transfer paper so I gently pealed this off the backing paper as I positioned it.
Then I used transfer tape to place the red frame. Lastly I added the photograph to the center of the hearts.
(Make Sure You Scroll To The Right For Both Images)
There You Have It
Thank you for reading my blog post and I hope that it has inspired you to try using some mixed media in your scrapbooking project.
Helen Williams
